Monday, October 21, 2013

Big Minis; plus using Future Floor Finish

Have you been watching the Reaper Bones 2 Kickstarter? It's already a great deal, and the more people pledge, the better a deal it becomes. The Kickstart is in its last few days, so don't miss out!

I'm trying something new by painting a bunch of larger monsters, rather than the hordes of smaller minis I usually do. This is also my chance to try out Future Floor Finish as a sealant and wash medium. I had used Minwax Polyshades (aka "The Dip") for this purpose, but after a few successful uses of the stuff, I started running into too many problems. I could handle the messiness, the unreliability, and the noxious fumes, but when I found out it was actually eating some of my figures, that was enough. I was looking for another cheap and easy alternative and discovered Future, a commercial floorcare product that's basically a clear acrylic that hobbyists of all kinds have been using for years (This page tells you almost as much as you'd ever want to know about using Future for modeling purposes).

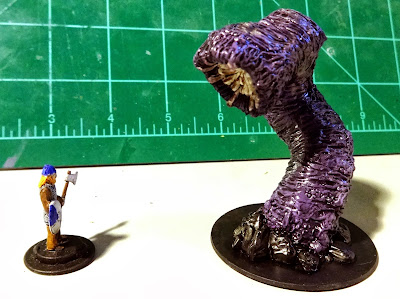
Let's start with this Purple Worm from Reaper Miniatures.


This is one of those figures that looks a lot better next to my smaller figures: it's not anywhere near menacing enough next to larger Reaper hero minis. This was a pretty simple painjob for my first large mini, just lots of purple with some light-purple drybrushing. I washed it with undiluted Future mixed with a little black paint. I didn't do anything to kill the gloss because I wanted the worm to look suitably slimy.

Next is this ogre, an Arcane Legions "Great One."


He looks a little more slovenly and less noble than the original paintjob, which I think is great. This time I made a mix of "magic wash," based off of this recipe. The one variation I used was to start with a jar of Tamiya Flat Base and mix it 1:10 with Future (as described in the "Complete Future" page I link to in the first paragraph). The Flat Base kills the shine, so you can wash and seal and not have to worry about matte spraying. I then diluted that mixture 4:1 with water, as the original recipe indicates. Note that this gets you about a liter of magic wash, so you should be more prepared than I was to store the mixture.
This squeezy mustard bottle and old salsa jar was almost enough to store all the wash I made. The bottle of Future (now marketed by Pledge) is on the left.
The squeezy bottle is good for dispensing the wash. You can see that the flat base settles at the bottom of the mix, but you can shake the bottle to mix it up before using. It makes bubbles, but contrary to the page I got the recipe from, I didn't find that to be a problem. After dispensing the wash, I used a brush to mix in enough black paint so the it just turned opaque, then brushed the mixture on the mini. I probably made it a little too dark, and I need to work on a more even washing technique, but overall I'm quite pleased with the results. The shading is right where it needs to be, plus I got a nice matte finish without an extra step.

I initially thought The Dip was a good quick finish to my minis because it seemed more or less all-in-one; everything was premixed, so I thought it should be easy to work with. That simply turned out not to be the case. With the Magic Wash, it took a little extra time to make the initial mixture, but the application and cleanup is so much easier. So far I like what I'm seeing!

Tuesday, October 15, 2013

Mod Squad (a squad of mods, that is)

I'm doing a little bit of painting, but it's a little bit tricky with the basement renovation going on. I did have a chance to play around with some mods and conversions, though. Behold my handiwork!

You've already met the demon legionnaire on the left; he's a Caesar Miniatures knight with a CP Models head. To his left is an earlier experiment with the demon legionnaire concept, which involved a head swap with a Caesar goblin. The female demon is a Caesar elf with some bat wings borrowed from a Safari Ltd. "good luck mini": she's also got a tale made from a paperclip, but it's hard to see. Fighting against these diabolical forces is an angelic warrior, made from an Arcane Legions hoplite and a pair of metal bird-wing charms. Less eschatological but no less fantastic is a 1/72 scale warforged, contrived here from a DDM Warforged Scout and the legs of a Caesar knight to give it height.

Dollar-store Thor gets a bit of an upgrade, as his hammer looked a little dinky in this particular sculpt. He got new hands and a sword from a Reaper Miniatures Battleguard Golem. I don't know if the golem figure will get Thor's old hands or something else.

Last are a bunch of hobgoblins. Hobgoblins in D&D are basically socially advanced, more militarized orcs, so I just used the more heavily armored Caesar orcs. Headswaps with Caesar knights allowed for even better armor, and weapon swaps with other orcs, along with some shields borrowed from my Italeri barbarians set, gave them some variety. I primed these guys today, so after I paint the larger minis I'm working on, these guys are probably my next project.

Wednesday, October 2, 2013

Heads by CP Models

I'll probably keep updating my Bones II post throughout the month. For now, this:

I mentioned these heads in an earlier post. They are made by CP Models for 15mm scifi miniature conversions, but I had a hunch that they'd work well for 1/72 scale. I think I was right!

Sorry for the blurry photo and indirect poses. From left to right are a walrus head, a gas mask, a cyclops, a bug head, a reptile head (which looks more pig-like than saurian to me), a squid head, and a daemon. I'm missing the amphibian and chimp heads. The cyclops looks a little small, but all the other heads are about the size of Sven's.
Conversion time! I set pins in my styrofoam blocks, with little bits of Sticky Tac to hold the heads in place. I then put Superglue on the pinheads and positioned the heads, then allowed to dry. The heads have little niches that are just a little smaller than the pins I used. Next time I may try a smaller pinhead, or just clip the pinheads off entirely. 
The permanently mounted heads. You can see there are little bits of metal flash, but I wasn't prepared to deal with them until they were more securely glued to their new bodies.
For the rest, I more or less following the steps I described for my zombie conversions: I drilled a fairly deep hole in the neck, trimmed the pin so it wasn't too long, added glue to the hole, and pushed the remainder of the pin until the new heads were flush with their bodies. Pushing on the head with a folded piece of paper towel ensures you have enough force without damaging the fine metal details on the heads. I then used a needle file to remove the bits of flash remaining on the heads.

The completed mods: A Caesar Miniatures knight and Hat druid become a demon legionnaire and a mind flayer.
Pros to the CP heads: Great detail, lots of variety and character available, most work perfectly for 20mm/1-72 scale conversions. Cons: some flash, conversions aren't easy with the pins I use, though paper clips or piano wire of the right gauge would work just fine. They are also just a little expensive: I paid about 50 cents a head, which puts me over my ideal budget of 50 cents a figure when you add the cost of the bodies. The random assortments are a little cheaper, with the tradeoff that you don't know what you'll get.

All in all I recommend these heads for the cheap fantasy miniaturist looking for a little variety in his collection. I bought a bunch of the daemon heads with the idea of putting together a demonic legion. But that will be a later post.

Tuesday, October 1, 2013

Bones II Kickstarter launched, funded!

So you've probably heard about this:

It was funded in under three minutes. It looks like they'll have trouble keeping up with the stretch goals on the main page, so if you really want to stay up-to-date, be sure to check out the Kickstarter's update page.

So we all know that Reaper Bones are just about the best value out there for a variety of high-quality, 32mm gaming minis, but what's in it so far for the 1/72 cheap fantasy miniaturist? Well, there are a couple of small-sized heroes in the core set that could be useful, plus a good number of animals that are probably easily adaptable. The "Dungeon Monsters" should be great, as aberrations adapt well to any scale. The Dragon add-on will be usable (though they've made plenty of dargons already); even more so the Kraken. I'm somewhat less enthused about all the bugbears and gnolls, as those figures don't work well at all in my chosen scale, but I can't say I blame Reaper for expanding these popular hoard-type monsters. Also, I'm still waiting on more of the Ben Siens kobold sculpts, which are great and which I already know work well in 1/72.

All in all, an exciting morning! Watch this post for more updates.

Updates: