I'm trying something new by painting a bunch of larger monsters, rather than the hordes of smaller minis I usually do. This is also my chance to try out Future Floor Finish as a sealant and wash medium. I had used Minwax Polyshades (aka "The Dip") for this purpose, but after a few successful uses of the stuff, I started running into too many problems. I could handle the messiness, the unreliability, and the noxious fumes, but when I found out it was actually eating some of my figures, that was enough. I was looking for another cheap and easy alternative and discovered Future, a commercial floorcare product that's basically a clear acrylic that hobbyists of all kinds have been using for years (This page tells you almost as much as you'd ever want to know about using Future for modeling purposes).
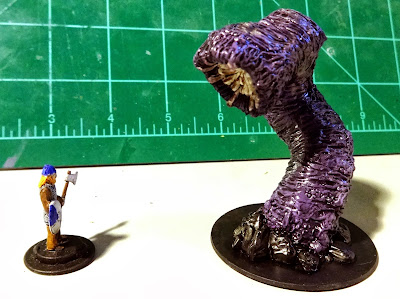
Let's start with this Purple Worm from Reaper Miniatures.
This is one of those figures that looks a lot better next to my smaller figures: it's not anywhere near menacing enough next to larger Reaper hero minis. This was a pretty simple painjob for my first large mini, just lots of purple with some light-purple drybrushing. I washed it with undiluted Future mixed with a little black paint. I didn't do anything to kill the gloss because I wanted the worm to look suitably slimy.
Next is this ogre, an Arcane Legions "Great One."
He looks a little more slovenly and less noble than the original paintjob, which I think is great. This time I made a mix of "magic wash," based off of this recipe. The one variation I used was to start with a jar of Tamiya Flat Base and mix it 1:10 with Future (as described in the "Complete Future" page I link to in the first paragraph). The Flat Base kills the shine, so you can wash and seal and not have to worry about matte spraying. I then diluted that mixture 4:1 with water, as the original recipe indicates. Note that this gets you about a liter of magic wash, so you should be more prepared than I was to store the mixture.
 |
| This squeezy mustard bottle and old salsa jar was almost enough to store all the wash I made. The bottle of Future (now marketed by Pledge) is on the left. |
The squeezy bottle is good for dispensing the wash. You can see that the flat base settles at the bottom of the mix, but you can shake the bottle to mix it up before using. It makes bubbles, but contrary to the page I got the recipe from, I didn't find that to be a problem. After dispensing the wash, I used a brush to mix in enough black paint so the it just turned opaque, then brushed the mixture on the mini. I probably made it a little too dark, and I need to work on a more even washing technique, but overall I'm quite pleased with the results. The shading is right where it needs to be, plus I got a nice matte finish without an extra step.
I initially thought The Dip was a good quick finish to my minis because it seemed more or less all-in-one; everything was premixed, so I thought it should be easy to work with. That simply turned out not to be the case. With the Magic Wash, it took a little extra time to make the initial mixture, but the application and cleanup is so much easier. So far I like what I'm seeing!


I know some people use future mixed with ink. I'll definitely check out your link.
ReplyDeleteHere is a link to some hand-built mini's, and terrain pieces. I'll start off with the mini's link, discussing the building of a Purple Worm (3.0+ version, with armor plating, but it can easily be modified to 1.0-2.5 versions, sans armor plating). Here is the video showing how it is done: http://dmscraft.freeforums.net/thread/1133/dms-craft-episode-purple-worm
ReplyDeleteHere is the link discussing it, with variants: http://dmscraft.freeforums.net/thread/1136/purple-worm-best-video?page=2&scrollTo=10028
Here is another link, discussing inexpensive mini's, and their conversions: link #1 -- http://dmscraft.freeforums.net/thread/1047/toys-cheap-miniatures
link #2 -- http://dmscraft.freeforums.net/thread/980/braves-custom-miniatures
Cheers!
Hey !
ReplyDeleteI've just tryed to make cheap terrain pieces !!!!
look at this : https://lh5.googleusercontent.com/-nbnB0Mj0qv4/Umzv5xM1rTI/AAAAAAAAX1w/YYKaR2vbSUI/w913-h549-no/20131027_105300.jpg
(you've probably recognized a arcane legion fig)
You can see it on the G+ community "1/72 - 20mm fantasy minis for rpg" :
https://plus.google.com/u/0/communities/113363218840328050806
The system works fine !
But I keep the grid system like this : http://www.youtube.com/user/TheDMGinfo
Do not hesitate to join the community to discuss cheap rpg minis (and now tiles !).
raph
I saw those on your G+ page! They look great, and the videos were very interesting as well.
DeleteSorry I haven't taken the time yet to join your page. I do plan on doing so, but I have a lot going on right now. I do check it daily.