Showing posts with label how-to. Show all posts

Monday, July 17, 2017

Crate work, everyone!

Hey, speaking of terrain:


Crates! These are a mix of Reaper Bones plastic and Rebel Miniatures resin. Painted up pretty quickly using something like the techniques described in this thread. I use mostly Delta Ceramcoat craft paints: here I did a base coat of Burnt Umber, then a heavy drybrush of Raw Sienna, lighter drybrushes of Straw and white, then another light drybrush with Raw Sienna again to balance the lighter colors. Then my standard "magic" black wash. Ecce, mirabiles!


Sven, who remember is about 1 inch tall, among the Reaper crates. These have a lot of great detail but somehow became noticeably warped. The leftmost crate is obviously askew here.


The Rebel Minis crates. These also have pretty good detail, and the resin of course isn't going to warp like the PVC plastic Bones are made of. Unfortunately, some bubbles must have formed when these were cast, leaving some rather bad pockmarks on some of these.

Despite these flaws, they look pretty good as a group.

Sven playing hide-and-seek.
I painted up a few more of the Reaper crates as cargo for my son's toy trains. Painting minis is tricky without a base to hold onto! I added an extra layer of Future Shine for added durability during play. They need a blast of Dullcoat, but it's been too hot for spraying.


And yes, my son painted those hopper cars himself!

P.S. I hope all my dear readers remember that I also have an RPG design blog, which isn't entirely moribund. I just started a series of posts on initiative checks, which will hopefully initiate more RPG blogging in the near future. Remember that the link to new posts can always be found in the sidebar.

Saturday, March 18, 2017

Storage Solutions

[RPG fans: Don't forget that I have a stand-alone RPG blog! I've been putting up a few new posts lately. Some are reposts from when I did RPG blogging on this blog, but there's also new content to check out. Please do so!]

One could say that I've painted a few minis, but I was never too satisfied with how I was storing them. I have a few drawer sets atop my painting table, including a mini hardware set of the sort intended to store screws and washers and things like that. It stores most of my 1 inch high minis quite well, and each set can live in its own somewhat portable drawer, but I have a few problems with this system. For one, it's not a display solution; it hides my completed projects instead of showing them off. More importantly, these drawers aren't at all airtight. That's not a problem for bolts and nails, but for minis it means they get quite dusty. So over the past year I've been leaning toward a better way.

Let's start with my new approach to storage trays.


Special points if you know what you're looking at. It's an Arcane Legions movement tray, of the sort that I've accrued in a plethora. I cut and superglued a bit of magnetic sheeting to fit, the kind designed to let you print your own refrigerator magnets. The magnet is strong enough to keep my metal washer bases in place so long as they aren't rocked too hard. I can even turn some of my lighter figures upside-down and have them stick for a bit. This way I can keep my little troops together and move them all at once.

But I still needed a place to put them all.


It's an Ikea display case, dubbed a Hemnes, to be specific. It was actually a Father's Day present from last year that I managed to finally build in the fall. It's a very nice piece, though I admit that the price tag is not exactly consistent with the Cheap Fantasy Minis ethos. I considered the cheaper Detolf that is often mentioned for mini storage, but while I liked the unobstructed all-glass look, it has a number of gaps on the edges and is not at all air-tight. If I wanted a dust-free solution, I had to splurge a bit. I'd like to upgrade with a Dioder lighting kit, and possibly some more shelves, but it looks pretty good for now.

Let's see how everything looks up close. Sorry for the intense flash on these.

Ranks of little troopers.

A mass of larger beasts.

My small but growing collection of stony terrain.
Regular CFM readers may realize that the three above shots do not represent everything I have painted. I need to make more magnetic trays and migrate everyone else to their new home. Ironically, that means that all those Arcane Legions movement trays I've collected, which were previously an albatross, are now in hot demand at the 1Mac household. Seriously, if any readers have any they'd like to be rid of, drop me a line!

Saturday, August 13, 2016

Guards and Bandits and Bondic

No I'm not dead, real life vs. hobby time, etc. Let's move on:

I finally got a chance to take some pics of my next project, these bandits and guards.


The bandits are a mix of Hat's reissued Airfix "Robin Hood" figures and Zvezda's medieval peasant levy. The guards are mostly Caesar medieval soldiers, with a couple Accurate knights (acquired in a trade with Mike) thrown in. Most are out of the box, but I indulged in a few mods.


Fantasy guards are often depicted with polearms and crossbows for some reason, so I tried to select the Caesar figures that were so armed. This only left a few available poses. The answer: headswaps, plus some knifework to remove scabbards and the like for variety.

The bandits didn't need as many mods, but some of them that would otherwise have been wielding scythes and similar peasant weapons got armswaps (a scythe-wielding bandit seemed very strange!). Here you can see my new fascination in use. Normally when doing mods like this, I'd use wood glue to fill any gaps. But lately I've been experimenting with a newish product called Bondic, and I'm pretty happy with it.
Bondic is a non-adhesive bonding agent that's sort of magical. It's a solution with various plastic elements as the solutes. These plastics tend to form a solid, except the solution prevents them from doing so almost indefinitely. Zap the liquid with a UV light (the orange device in the pic above) after applying it with the pen-like tip, though, and the solvent evaporates. [edit: I didn't have this exactly right. See my comment below] The result is a solid mass of plastic in about four seconds where there once was a liquid. Magic!

I've found all sorts of household applications for the stuff, but the relevant use is for filling gaps in modded figures.


I also made up this bard-type figure, using an Imex pioneer figure for the torso (Sean did something similar, but I can't find the post right now).


You can perhaps see that the gaps around the arms of the gray Zvezda figures have some clear plastic around them. The base of the tan Hat fig also has some to fill the visible part of the hole in the washer I used as a base. That's the cured Bondic in use. The big advantage Bondic has over glue for this sort of thing is ease of control: you can add as little as you need, it tends to flow into crevices, and you can always build up applications if you need more. It's also a lot more durable than glue, as it's solid plastic. Just remember that it can't be used to glue things together like adhesive, but for filling visible gaps it's hard to beat.

I also took some shots after priming, just so you can see how it looks painted. No gaps!


I'm still in the middle of a big freelance job, but hopefully I'll have more time to work on figures soon. Thanks for checking in!

Tuesday, June 23, 2015

Homemade gelatin

The gelatinous cube, a creature genetically adapted to graph paper, remains one of the most iconically ridiculous monsters in the D&D canon. It's simplicity, in addition to how expensive commercial miniature representations of it tend to be, invite all sorts of homebrew miniature solutions. EY's recent post on using plastic ice cubes as 1/72 gelatinous cubes prompted me to finally finish my own homebrew version of the geometric critter. Tada!


The core of this project is this thing:


It's an itty-bitty, 2"x2"x2" display case made for golf balls. I got a six pack of them from Amazon, but I bet you can get them individually at sporting goods stores for under $2.

The chief draw for these is that they slide apart,...


...because the fun of a mini for a clear monster whose main power is engulfing PCs is in actually putting hero minis inside.

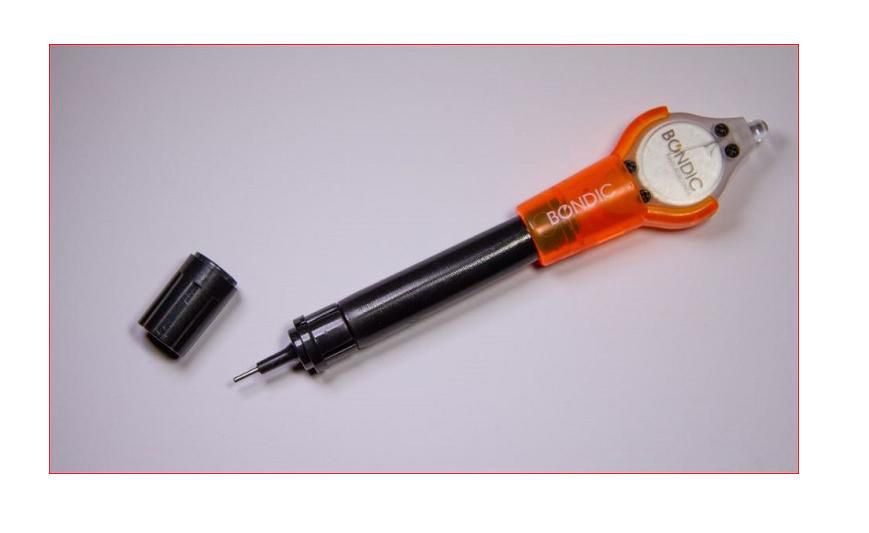
I could have used these as is, but they are a little too platonically cubic. I wanted some sort of texture to show that it was made of organic goop of some kind. I considered substances like clear caulk, but instead I finally decided on Gloss Gel Medium, a finishing product for artists made by Liquitex that dries clear and with a textured surface. $6 after the requisite 40% off coupon at Hobby Lobby for a fair sized bottle, which I decided was cheap enough if I use it for other modeling projects. I could use it for other oozes, for example, and it seems like it would work for choppy water as well.

Separate the cube as shown above, then sand the surfaces you plan to treat so the Gloss sticks. Wash afterwards to remove plastic dust and allow to dry thoroughly. I painted both sides of the bottom face with several coats of black paint, then added the gel medium to the top face of the black surface (which is to say, the "floor" inside the cube).

I had glued the 2" fender washer to the base before sanding and washing, but I recommend doing so afterwards instead. The washer makes the cube much more stable.
I also added the Gloss to all the clear outside surfaces. Try not to get any medium on the bevelled edges, so the two parts slide apart as easily as possible. You may want to run a knife over these edges as well, so the fit isn't quite so snug.


A layer of Future shine or some other finish on the bottom is a good idea to keep it from scuffing. You could paint Future on the rest of the mini too, but it's not really necessary; the Gloss Medium is shiny and resilient enough on its own.

Large enough to comfortably accommodate one comparison viking!
One downside to this approach: Even after shaving the bevelled edges to make the fit a bit looser, it's still sort of tough to separate the two halves of the cube. I'm thinking of some sort of tab to make separation easier. Still, I think it looks pretty good, and it's pretty easy to make.

Since I still have five of these golf ball display cases, I can make more of these things. Would anyone be interested in getting one as a trade, or possibly some sort of future giveaway?

Sunday, April 27, 2014

"Real" Fire!


This big guy is a clear plastic Reaper Bones Large Fire Elemental. I haven't painted it yet; what you see is the result of "real" flickering fire action, effected by a cheap, disassembled tea light inserted into the mini. It's a cool trick, one that I've seen elsewhere many places. Frankly you could just as well skip this little tutorial and check out the much better one at Chris Palmer's excellent "All Bones About It" painting blog. One thing I tried to do was make the tealight accessible in case it ever needed replacing, so if you're interested in what I did differently, feel free to soldier on!

Here's the tea light, painstakingly torn apart with the aid of a hobby knife and razor saw. You can see where I slit down the middle of the base to begin getting inside the thing. Also shown is a regular 2" metal washer.

The guts of the device, glued to the washer. There was a lip at the bottom of the tealight that I had to slice off to make it flush with the washer. I also had to be sure that the switch at the bottom was accessible through the washer and had enough clearance to operate, and that I didn't get glue in the switch!

I built around the electronics with Milliput. At the time I had the figure glued to the base and had both in position over the electronics; this way I could sculpt around them and not get any putty in any sensitive bits. You can see that I've already primed the base in this shot.

I did a lot of cutting to make the base as short as possible while still containing all the gizmos inside. You can also sort of see where I drilled into the base of the figure so the lightbulb would go in. You can also see my new approach to attaching the figure to the base: I drilled three holes with a pin vice, inserted push pins from the bottom, and trimmed them so they were about a centimeter tall. I then drilled holes in the bottom of the figure to match.

Here you can see the bottom of the figure with the base attached. Note the three pinheads.

Here's the figure standing with the base attached, but disconnected from the full assembly.

And here it is fully assembled next to Sven the 1/72 comparison mini, who is feeling unaccountably warm all of a sudden. I did the best I could to minimize the height of the base, but it's still rather tall.

Totally worth it, though!
I still need to figure out how I want this critter painted. Chris has some excellent ideas. I'm pleased with how it's going so far though; I can take everything apart and reassemble with little effort, and it's already all glowy and cool. And glowy and cool is about everything I want out of a fire mini.

Monday, October 21, 2013

Big Minis; plus using Future Floor Finish

Have you been watching the Reaper Bones 2 Kickstarter? It's already a great deal, and the more people pledge, the better a deal it becomes. The Kickstart is in its last few days, so don't miss out!

I'm trying something new by painting a bunch of larger monsters, rather than the hordes of smaller minis I usually do. This is also my chance to try out Future Floor Finish as a sealant and wash medium. I had used Minwax Polyshades (aka "The Dip") for this purpose, but after a few successful uses of the stuff, I started running into too many problems. I could handle the messiness, the unreliability, and the noxious fumes, but when I found out it was actually eating some of my figures, that was enough. I was looking for another cheap and easy alternative and discovered Future, a commercial floorcare product that's basically a clear acrylic that hobbyists of all kinds have been using for years (This page tells you almost as much as you'd ever want to know about using Future for modeling purposes).

Let's start with this Purple Worm from Reaper Miniatures.


This is one of those figures that looks a lot better next to my smaller figures: it's not anywhere near menacing enough next to larger Reaper hero minis. This was a pretty simple painjob for my first large mini, just lots of purple with some light-purple drybrushing. I washed it with undiluted Future mixed with a little black paint. I didn't do anything to kill the gloss because I wanted the worm to look suitably slimy.

Next is this ogre, an Arcane Legions "Great One."


He looks a little more slovenly and less noble than the original paintjob, which I think is great. This time I made a mix of "magic wash," based off of this recipe. The one variation I used was to start with a jar of Tamiya Flat Base and mix it 1:10 with Future (as described in the "Complete Future" page I link to in the first paragraph). The Flat Base kills the shine, so you can wash and seal and not have to worry about matte spraying. I then diluted that mixture 4:1 with water, as the original recipe indicates. Note that this gets you about a liter of magic wash, so you should be more prepared than I was to store the mixture.
This squeezy mustard bottle and old salsa jar was almost enough to store all the wash I made. The bottle of Future (now marketed by Pledge) is on the left.
The squeezy bottle is good for dispensing the wash. You can see that the flat base settles at the bottom of the mix, but you can shake the bottle to mix it up before using. It makes bubbles, but contrary to the page I got the recipe from, I didn't find that to be a problem. After dispensing the wash, I used a brush to mix in enough black paint so the it just turned opaque, then brushed the mixture on the mini. I probably made it a little too dark, and I need to work on a more even washing technique, but overall I'm quite pleased with the results. The shading is right where it needs to be, plus I got a nice matte finish without an extra step.

I initially thought The Dip was a good quick finish to my minis because it seemed more or less all-in-one; everything was premixed, so I thought it should be easy to work with. That simply turned out not to be the case. With the Magic Wash, it took a little extra time to make the initial mixture, but the application and cleanup is so much easier. So far I like what I'm seeing!

Wednesday, October 2, 2013

Heads by CP Models

I'll probably keep updating my Bones II post throughout the month. For now, this:

I mentioned these heads in an earlier post. They are made by CP Models for 15mm scifi miniature conversions, but I had a hunch that they'd work well for 1/72 scale. I think I was right!

Sorry for the blurry photo and indirect poses. From left to right are a walrus head, a gas mask, a cyclops, a bug head, a reptile head (which looks more pig-like than saurian to me), a squid head, and a daemon. I'm missing the amphibian and chimp heads. The cyclops looks a little small, but all the other heads are about the size of Sven's.
Conversion time! I set pins in my styrofoam blocks, with little bits of Sticky Tac to hold the heads in place. I then put Superglue on the pinheads and positioned the heads, then allowed to dry. The heads have little niches that are just a little smaller than the pins I used. Next time I may try a smaller pinhead, or just clip the pinheads off entirely. 
The permanently mounted heads. You can see there are little bits of metal flash, but I wasn't prepared to deal with them until they were more securely glued to their new bodies.
For the rest, I more or less following the steps I described for my zombie conversions: I drilled a fairly deep hole in the neck, trimmed the pin so it wasn't too long, added glue to the hole, and pushed the remainder of the pin until the new heads were flush with their bodies. Pushing on the head with a folded piece of paper towel ensures you have enough force without damaging the fine metal details on the heads. I then used a needle file to remove the bits of flash remaining on the heads.

The completed mods: A Caesar Miniatures knight and Hat druid become a demon legionnaire and a mind flayer.
Pros to the CP heads: Great detail, lots of variety and character available, most work perfectly for 20mm/1-72 scale conversions. Cons: some flash, conversions aren't easy with the pins I use, though paper clips or piano wire of the right gauge would work just fine. They are also just a little expensive: I paid about 50 cents a head, which puts me over my ideal budget of 50 cents a figure when you add the cost of the bodies. The random assortments are a little cheaper, with the tradeoff that you don't know what you'll get.

All in all I recommend these heads for the cheap fantasy miniaturist looking for a little variety in his collection. I bought a bunch of the daemon heads with the idea of putting together a demonic legion. But that will be a later post.

Friday, May 31, 2013

1/72 Zombies step-by-step Pt. 3: Zombies complete!


(Update: New camera, new photos!) Zombies are finally complete! Part 1 of this tutorial covered modding figures to make 1/72 zombies, part 2 covered actual painting, and this part will cover finishing touches, including the "magic dip" method for adding outlines and shadows.

IMPORTANT UPDATE (10/2013)!: After using this method on several miniatures, I've concluded that the solvent used in the Minwax dip is reactive to certain kinds of plastic, creating a sticky sheen that matte spray can't kill or contain. This includes the softer plastic used in Caesar Miniatures and Twilight Creations minis used here, plus the material used in Reaper Bones. The Italeri minis used for these zombies seems unaffected, as does the harder plastic used in Warhammer, Arcane Legions, Age of Mythology, and strangely, the soft plastic used by Hat.

I can't really recommend this method anymore. If you still want to use it, make sure it's on plastic that won't react by testing first, or find a way to seal the plastic before dipping (primer and paint isn't sufficient). I brushed on a coat of Pledge Floor Care Multisurface Finish (aka Future Shine) on all my affected minis, and it seems to have alleviated the problem significantly; it may also be enough of a seal to protect minis from The Dip.
1. The first step is to finish the bases. I just paint them with a couple coats of flat black paint. I don't like anything more detailed, preferring as neutral a base as I can so I can feasibly use these figures for a number of scenarios. If I added static grass, for example, they would look strange in an indoor dungeoncrawl.

2. The eponymous "dip" is this stuff: Minwax Polyshades, Classic Black Satin finish. It's wood stain and finish in one.  The figure is mounted here on a battery-powered drill: this is another reason I glue my minis to nails when painting. Some people prefer the control of painting the "dip" onto their figures, but as I find one needs to wipe the dip off no matter what, I like actually dunking the figures in the dip

3. I do this with a box nearby and plenty of paper towels on hand. I open the can, dip the mini while holding the drill, then immediately hold it over the box and spin the drill, to shake off most of the excess dip. Be sure to do this in a well-ventilated area, and to put the lid back on the can when you aren't using it to minimize exposure to fumes.

4. After it's dipped, you'll need to remove even more excess dip. Blowing on the mini while it's in the box will get rid of the globs that tend to accumulate between arms and legs, and a paper towel will soak any dip that pools in the neck and other places. Dab if you want to reduce the amount of dip, and wipe if you want to remove most of it. By the way, your minis usually won't turn out this dark: I have a problem with too-thick dip that I'll need to solve.

5. Give the dip at least a full day to dry (IMPORTANT UPDATE: I've since learned that 3 or 4 days at least is necessary for the dip to dry, or it will eventually turn sticky). Even with the satin finish instead of the gloss, the dip looks way too shiny for most minis. A matte spray will solve this problem, and will also provide another layer of protection. Do this outside on a fairly warm day with fairly low humidity, and be sure to rotate the figures and spray as much of them as you can.

6. Give the matte around an hour to dry: You'll see that it kills the shine and also gets rid of a lot of the blobbiness the dip leaves. At this point you can simply pry the minis off the nail head, and they're mostly ready to go (the nails are reusable). You may want to use a hobby knife or emory board to get rid of any excess glue or paint that accumulated around the nail head on the bottom of the miniature, so it will rest flat on the table.
I hope this tutorial was helpful to at least some of you. As I mentioned, I'm concerned by how dark and splotchy the dip is leaving my figures lately. It's a decent effect for zombies, but I used to get a much cleaner look from this method. I think the problem is that I was lazy about fully sealing the can of dip when I was done with it, which allowed for a degree of evaporation that has now left the dip too thick. I need to figure out a way to thin it with something that won't eat my plastic figures. I'd welcome any suggestions!

Sven's bad day, part 2.